0x1 前言
本文将分享使用Objective-C语言实现一种高可用、易扩展的App设置页。在demo中将会以淘宝、货拉拉的设置页面为例进行讲述。
0x2 分析
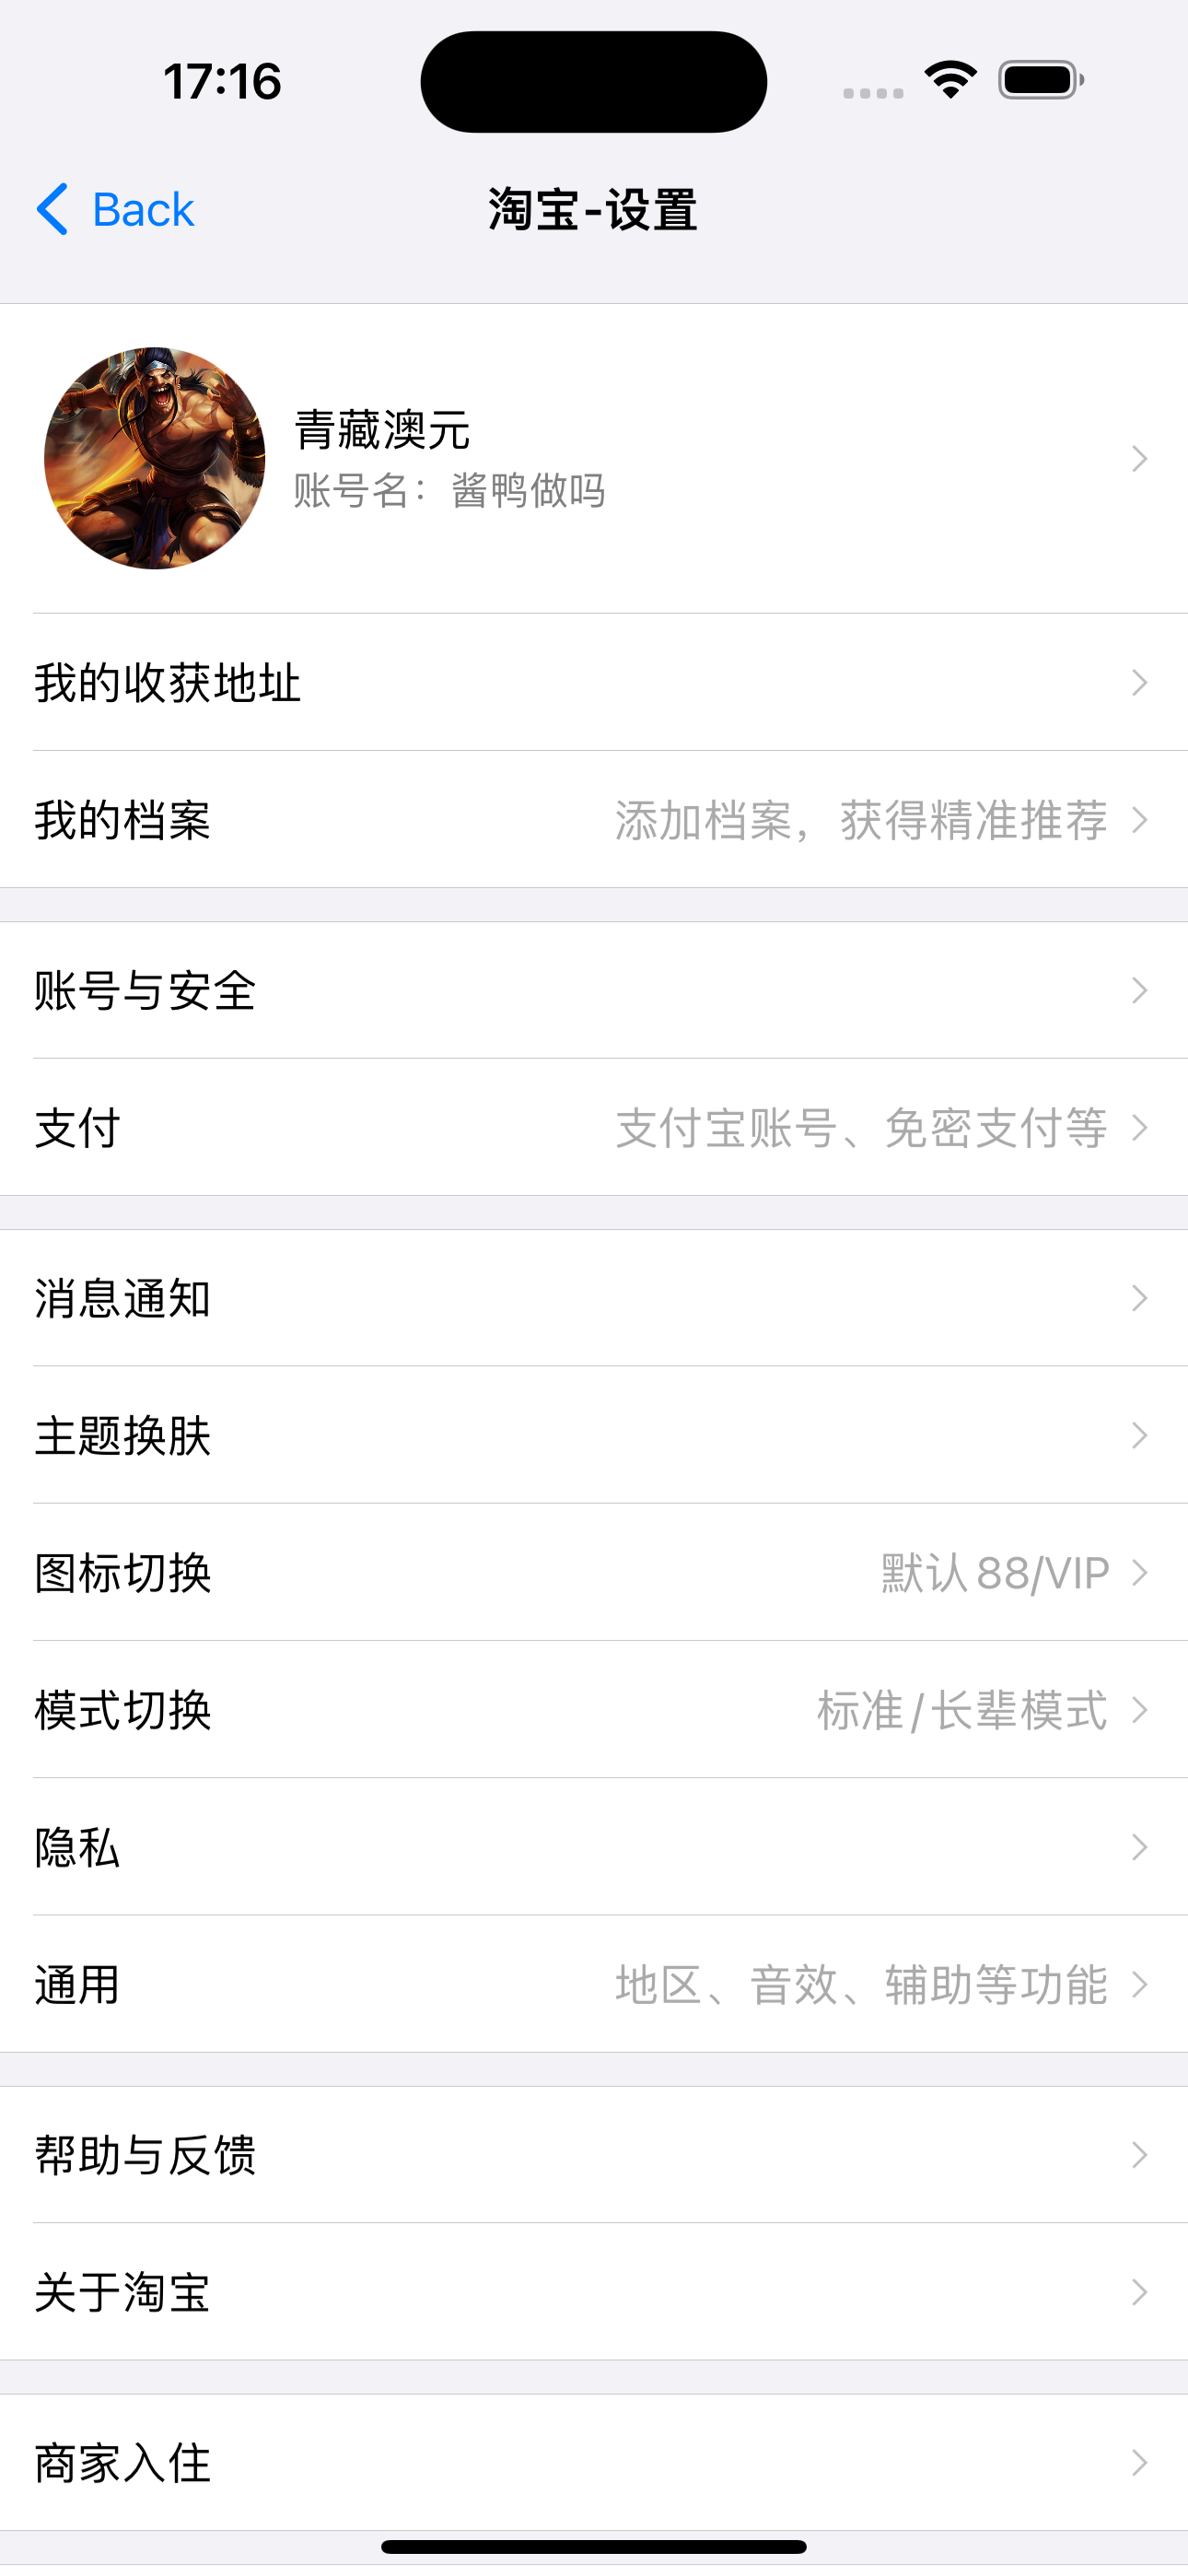
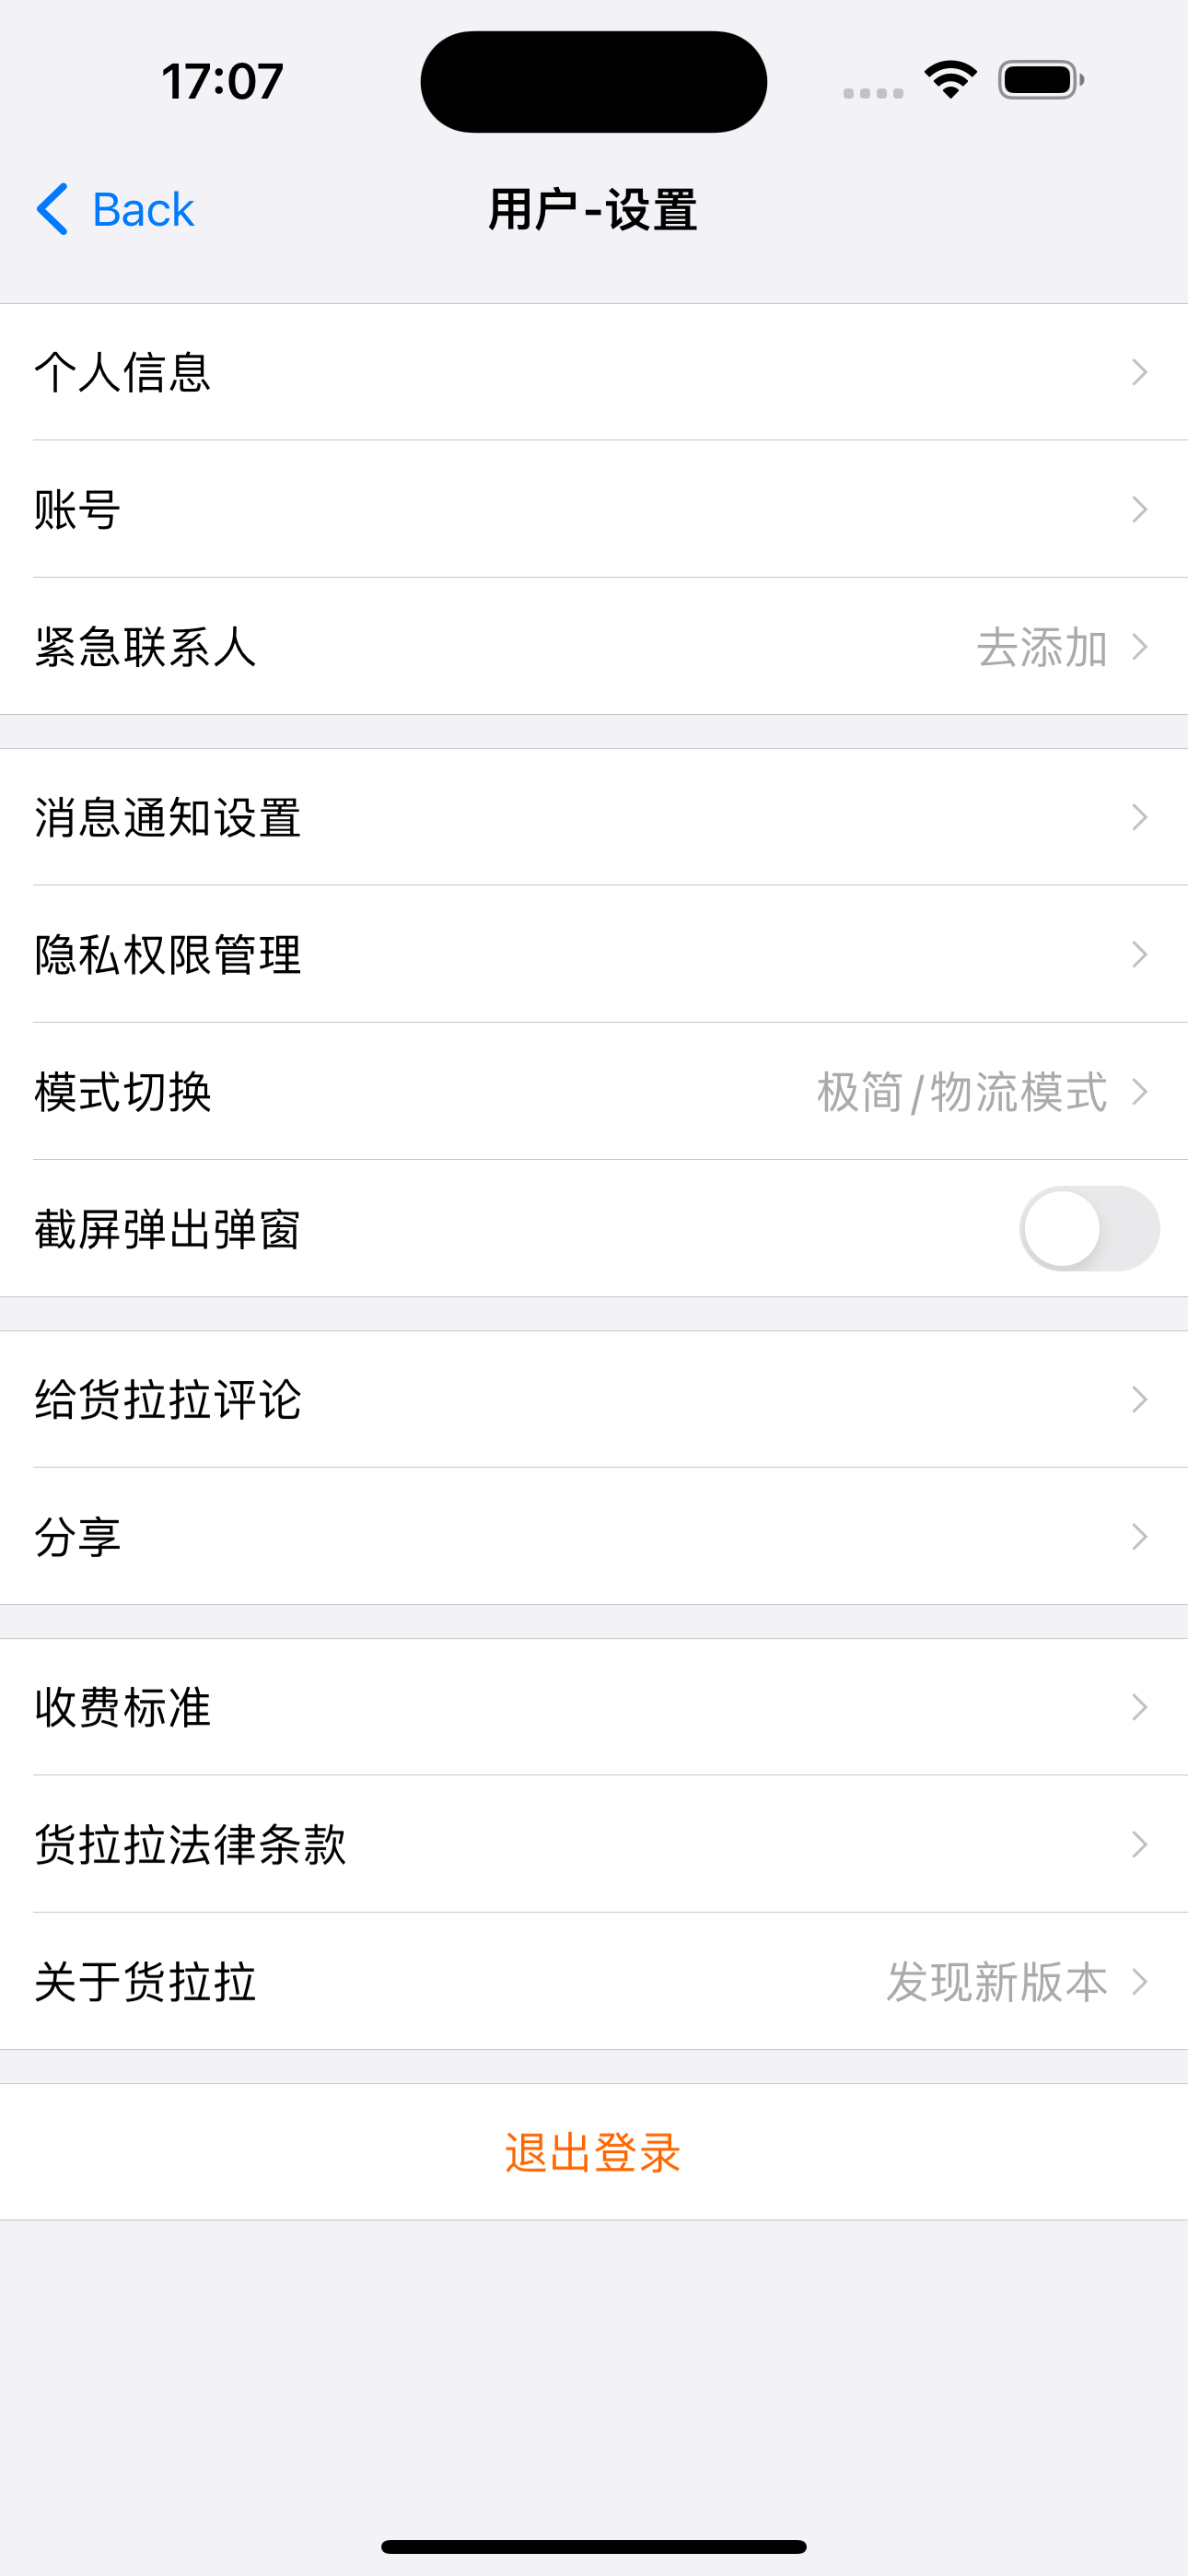
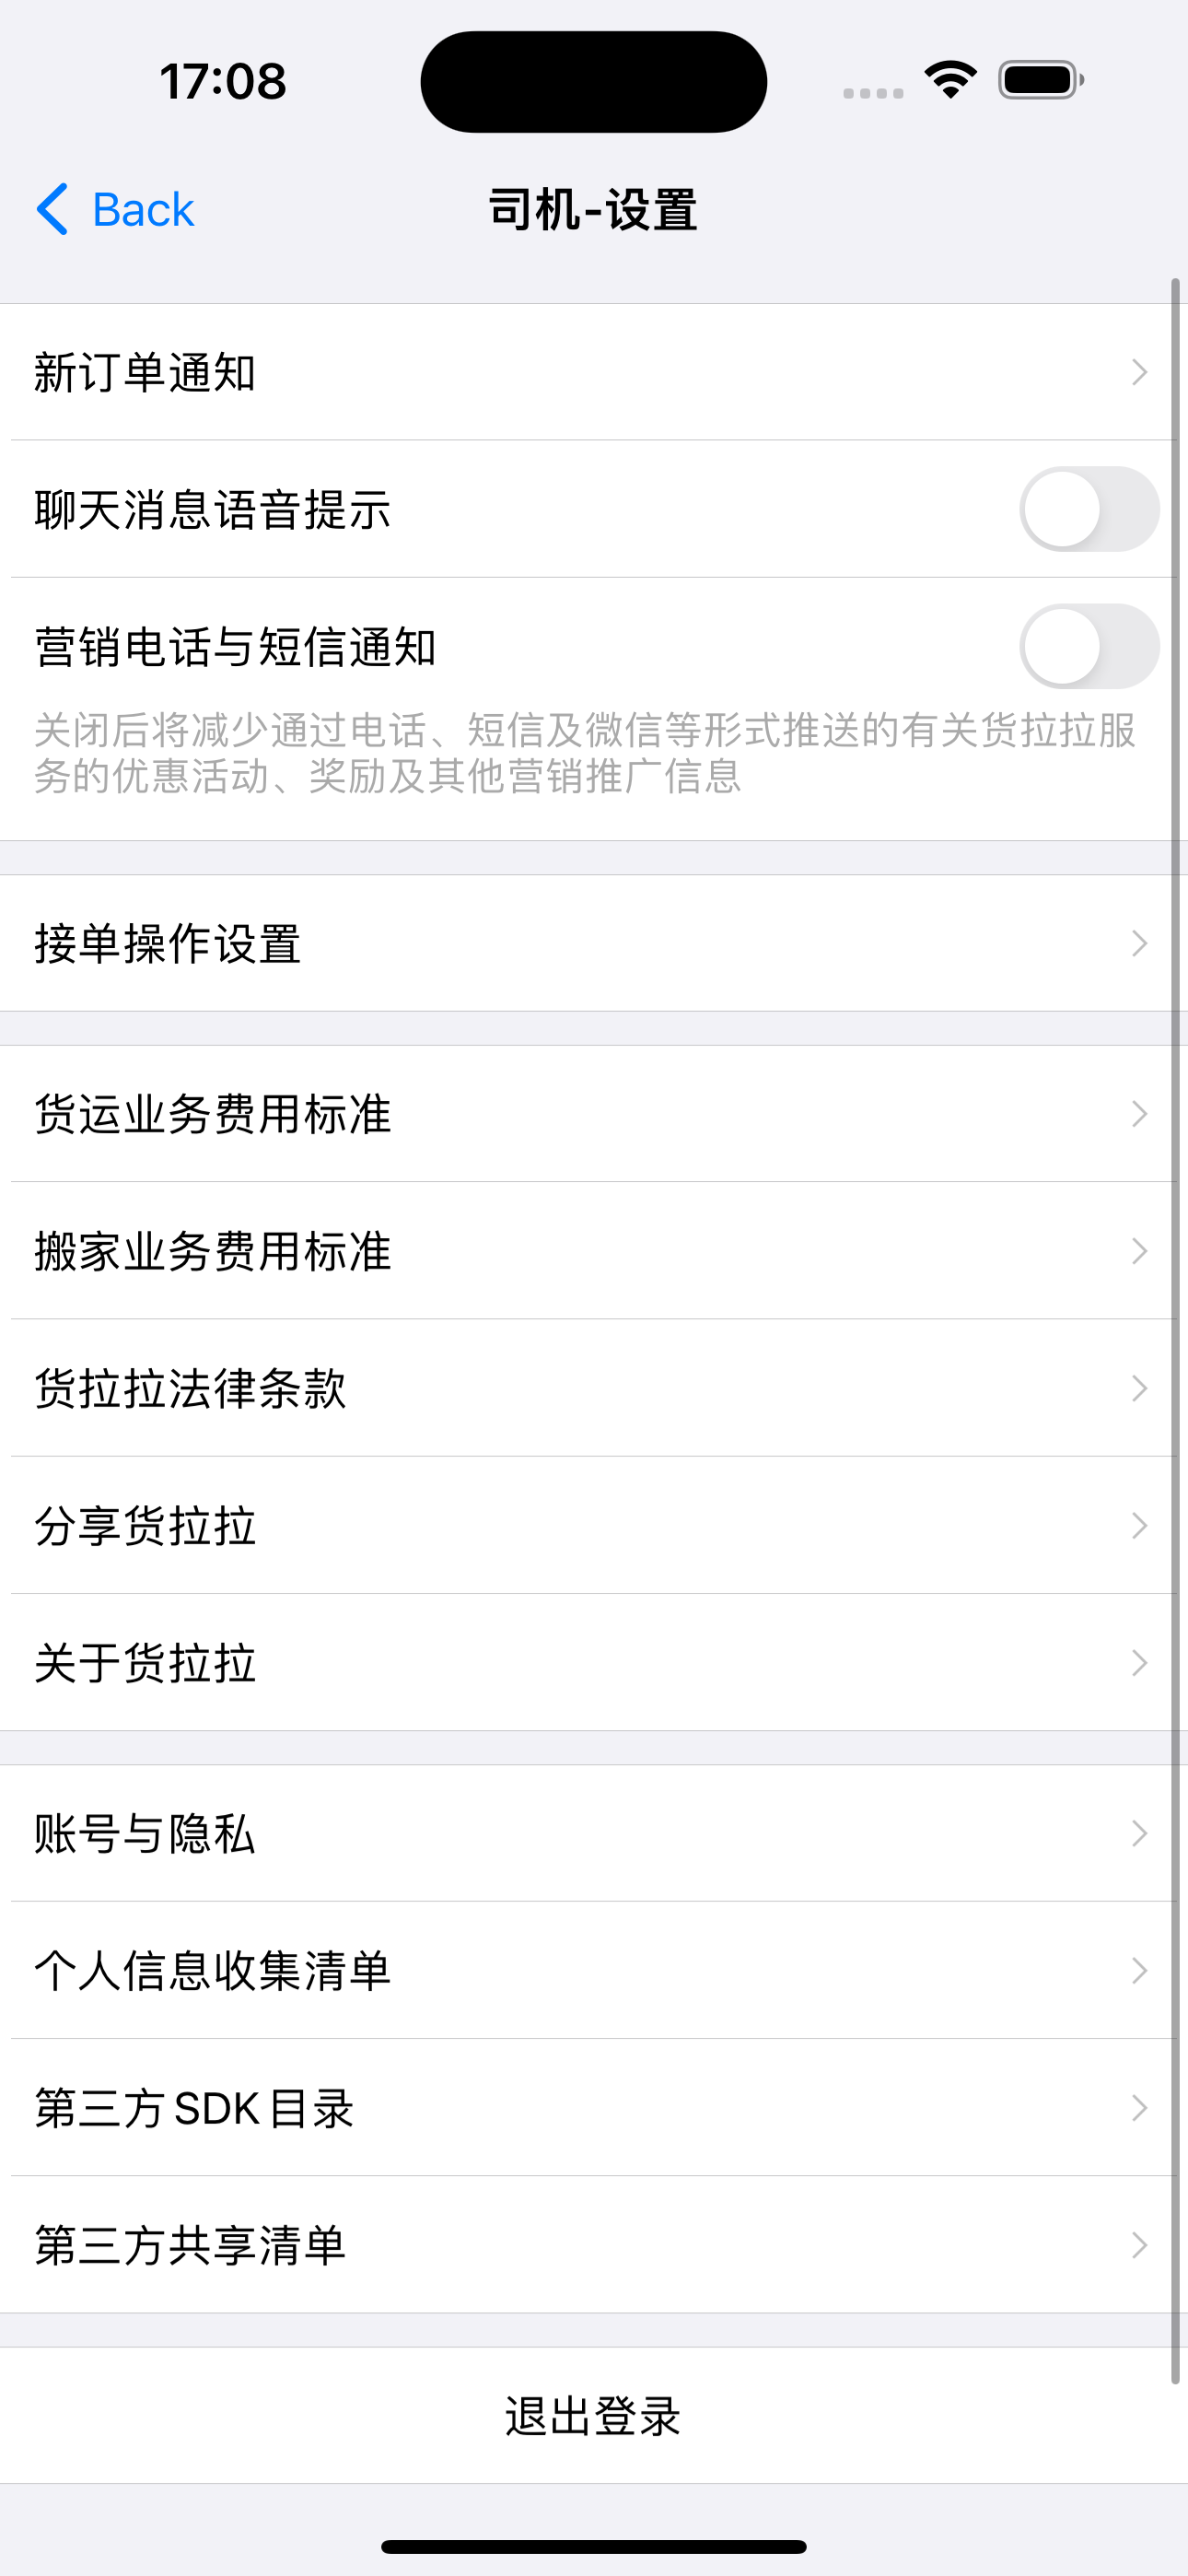
如图所示,分析对比以下三张图:
1.确定易变部分。
- 每一行的cell内容与其点击事件属于易变部分,跟随业务需求进行变化
- 整体设置页面的结构也属于易变部分,但不在本文讨论范围。
2.根据页面结构确定数据结构
- 该页面结构是一个列表页面,所以定义数据源类型为一个数组结构
- 每个cell按功能大类进行了分区,所以数据源是二维数组结构,便于分区管理
- 每个cell的样式、功能可能都不一致,所以二维数组中的元素类型定义为id类型
let dataSource = [
[id, id, id],
[id, id],
[id, id, id, id]
]
3.根据已有的UI结构,划分cell的种类。
按三张图中的cell,其实都可以划分为一类cell,但是会提高该cell的复杂度,不易维护与扩展,所以这里按样式划分,将cell类型分成以下四种:
- 头像cell(AvatarCell):头像、昵称、描述、箭头 -> AvatarModel
- 基础cell(SampleCell):标题、箭头>、箭头文本 -> SampleModel
- 开关cell(SwitchCell):标题、开关、描述 -> SwitchModel
- 退出cell(ExitCell):单文本 -> ExitModel
每种cell对应的数据源根据cell展示所需进行设计,所以对应四种cell模型。
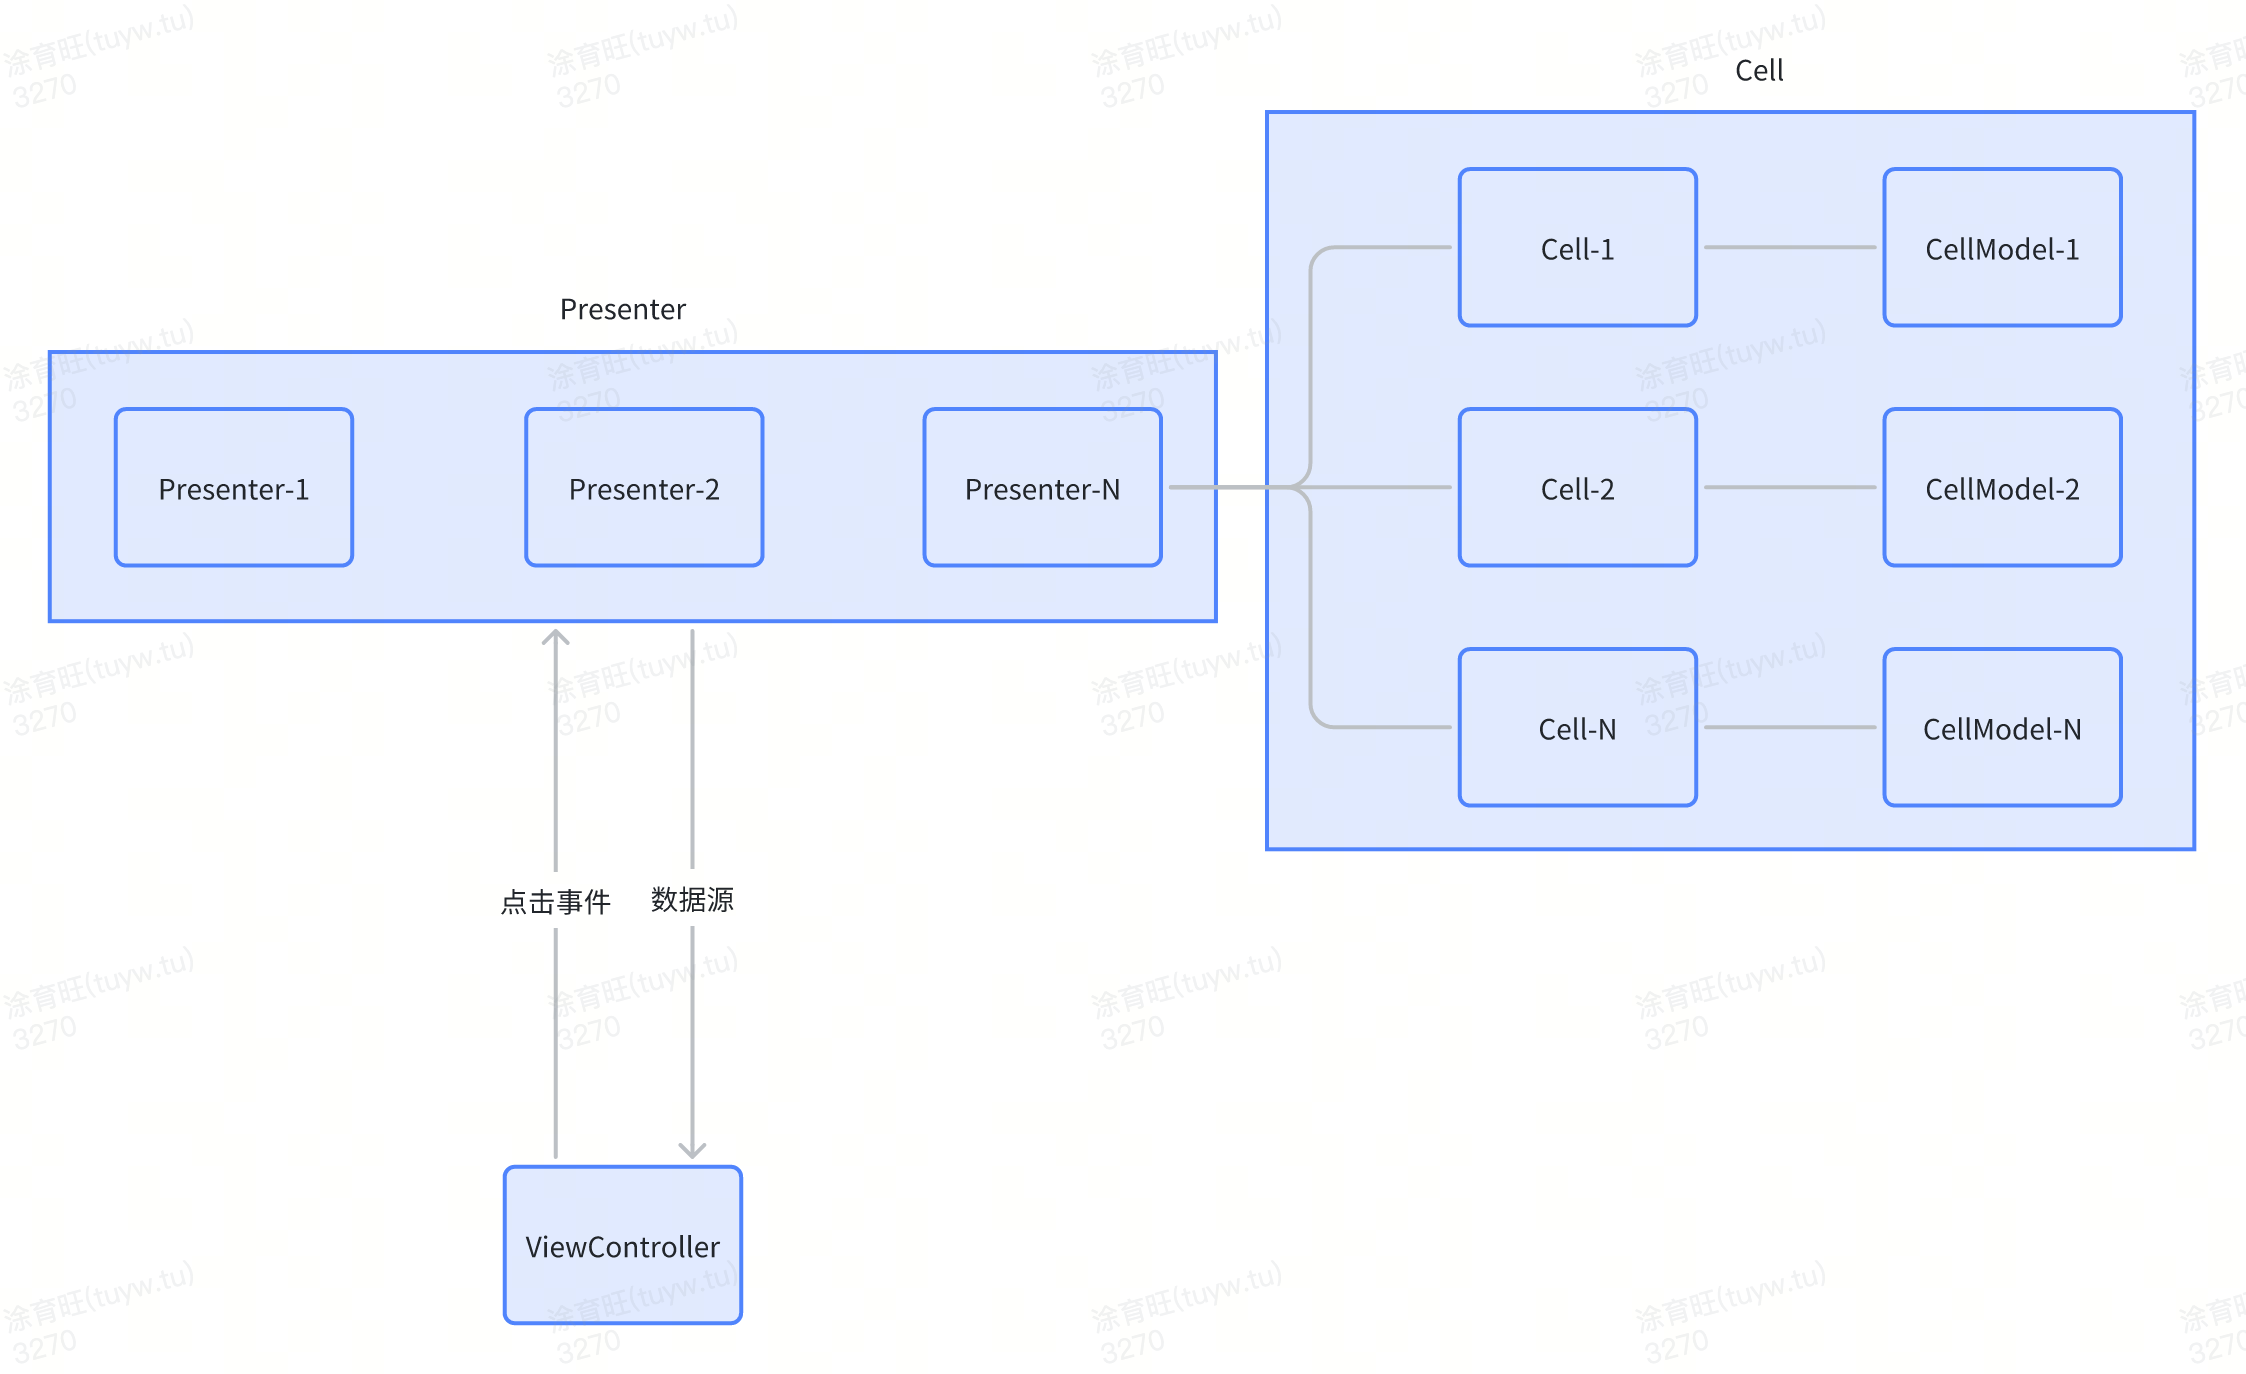
4.抹平cell model类型与cell点击事件。
从前面所述,设置页面的数据源定义为二维数组类型,数组中只能放同一类型的元素对象,且各个cell的数据结构不同。所以设计一个新的模型,携带cell数据与事件函数。
- responseSelector为cell的点击事件处理函数,由于并不是每个cell都会有cell的点击事件,所以selector可能为nil。
- model为每种类型cell所需要的数据源
- cellClass为cell的具体类,与model相对应
@interface SettingModel : NSObject

@property (nonatomic, strong) Class cellClass;
@property (nonatomic, assign, nullable) SEL responseSelector;
@property (nonatomic, strong) id model;

@end
0x3 Coding
1.编写AvatarCell与其model的实现逻辑
该cell的UI元素为以下几点:
- 头像
- 昵称
- 小标题(一般可有可无,所以需要设计成可以为nil)
所以AvatarModel代码定义如下:
@interface AvatarSettingModel: NSObject

@property (nonatomic, copy) NSString *avatar;
@property (nonatomic, copy) NSString *title;
@property (nonatomic, copy, nullable) NSString *subtitle;

+ (AvatarSettingModel *)title:(NSString *)title avatar:(NSString *)avatar subtitle:(nullable NSString *)subtitle;

@end
定义cell遵循的协议,用来抹平各个cell的差异性
1
2
3
4
5
6
@protocol SettingCellProtocol <NSObject>

- (void)setDataSource:(id)dataSource;

@end
AvatarCell实现初始化代码与协议更新UI逻辑
@interface AvatarSettingCell : UITableViewCell <SettingCellProtocol>

@end


@implementation AvatarSettingCell

- (instancetype)initWithStyle:(UITableViewCellStyle)style reuseIdentifier:(NSString *)reuseIdentifier {
	//布局逻辑
	return self;
}

- (void)setDataSource:(id)dataSource {
    NSParameterAssert([dataSource isKindOfClass:AvatarSettingModel.class]);
    AvatarSettingModel *model = dataSource;
    //赋值逻辑
    //...
}
@end
2.根据其他cell页面元素实现其初始化与协议更新UI逻辑(不重复赘述相同操作,此处省略)
3.将cell、model与设置页面串联起来
将model的定义也声明成协议,抹平不同model之间的差异性,并可以调用model指定的函数
@protocol SettingModelProtocol <NSObject>

- (Class)cellClass;
- (SEL)responseSelector;
- (id)model;

@end
创建tableView与其数据源
@interface SettingViewController ()

@property (nonatomic, copy) NSArray<NSArray<id<SettingModelProtocol>> *> *dataSource;

@end

@implementation SettingViewController

- (void)viewDidLoad {
    [super viewDidLoad];
    // Do any additional setup after loading the view.
    self.tableView.estimatedRowHeight = UITableViewAutomaticDimension;

    self.dataSource = [self getDataSourceFromCode];
}

- (NSArray<NSArray<id<SettingModelProtocol>> *> *)getDataSourceFromCode {
    NSString *subtitle = @"账号名:酱鸭做吗";
    NSString *avatar = @"https://img.touxiangkong.com/uploads/allimg/2022021820/awmxjquxevq.jpg";
    return @[
        @[[SettingModel avaterCell:@"青藏澳元" avatar:avatar subtitle:subtitle selector:@selector(avatar)],
          [SettingModel sampleCell:@"我的收获地址" selector:@selector(address)],
          [SettingModel sampleCell:@"我的档案" accessory:@"添加档案,获得精准推荐" selector:@selector(myProfile)]],

        @[[SettingModel sampleCell:@"账号与安全" selector:@selector(account)],
          [SettingModel sampleCell:@"支付" accessory:@"支付宝账号、免密支付等" selector:@selector(pay)]],

        @[[SettingModel sampleCell:@"消息通知" selector:@selector(messageNoti)],
          [SettingModel sampleCell:@"主题换肤" selector:@selector(themeSkinChanging)],
          [SettingModel sampleCell:@"图标切换" accessory:@"默认88/VIP" selector:@selector(changeIcon)],
          [SettingModel sampleCell:@"模式切换" accessory:@"标准/长辈模式" selector:@selector(modeChange)],
          [SettingModel sampleCell:@"隐私" selector:@selector(privacy)],
          [SettingModel sampleCell:@"通用" accessory: @"地区、音效、辅助等功能" selector:@selector(currency)]],

        @[[SettingModel sampleCell:@"帮助与反馈" selector:@selector(help)],
          [SettingModel sampleCell:@"关于淘宝" selector:@selector(about)]],

        @[[SettingModel sampleCell:@"商家入住" selector:@selector(merchantCheckIn)]],

        @[[SettingModel exitCell:@"切换账号" selector:@selector(changeAccount)]],

        @[[SettingModel exitCell:@"退出登录" selector:@selector(logout)]]
    ];
}

- (NSInteger)numberOfSectionsInTableView:(UITableView *)tableView {
    return self.dataSource.count;
}

- (NSInteger)tableView:(UITableView *)tableView numberOfRowsInSection:(NSInteger)section {
    return self.dataSource[section].count;
}

- (UITableViewCell *)tableView:(UITableView *)tableView cellForRowAtIndexPath:(NSIndexPath *)indexPath {
    id<SettingModelProtocol> model = self.dataSource[indexPath.section][indexPath.row];
    NSString *identifier = NSStringFromClass(model.cellClass);

    UITableViewCell<SettingCellProtocol> *cell = [tableView dequeueReusableCellWithIdentifier:identifier];

    if (!cell) {
        cell = [[model.cellClass alloc] initWithStyle:UITableViewCellStyleDefault reuseIdentifier:identifier];
    }
    cell.selectionStyle = UITableViewCellSelectionStyleNone;

    [cell setDataSource:model.model];

    return cell;
}

//事件处理
- (void)tableView:(UITableView *)tableView didSelectRowAtIndexPath:(NSIndexPath *)indexPath {
    if (self.dataSource.count > indexPath.section &&
        self.dataSource[indexPath.section].count > indexPath.row) {
        id<SettingModelProtocol> model = self.dataSource[indexPath.section][indexPath.row];
        if ([self respondsToSelector:model.responseSelector]) {
        	//声明的函数可以接受/不接受参数,不影响调用
            [self performSelector:model.responseSelector withObject:model.model];
        }
    }

}

#pragma mark - Cell Click

//不接受参数
- (void)avatar {
    NSLog(@"avatar");
}

//也可改成接受参数(二选一,取决于创建模型时传入的@selector(avatar)是否带参数)
- (void)avatar:(id)model {
    NSLog(@"avatar");
}

- (void)address {
    NSLog(@"address");
}

- (void)myProfile {
    NSLog(@"myProfile");
}

//...

@end
代码写到这里基本上已经实现了设置页面的数据源驱动化,通过传入不同的cell模型与实现事件具体逻辑即可方便的扩展设置页面的cell排序、样式与事件。
0x4 Cell内部事件
对于cell中有其他事件需要处理的部分,可以参照以下实现方式进行处理。
1.声明cell内部事件处理协议
- cell: 当前响应事件的cell
- indexPath: cell在tableView中的索引
- parameters:cell中回调给外面的数据
@protocol SettingCellEventProtocol <NSObject>

@optional
- (void)cell:(UITableViewCell *)cell didSelected:(NSIndexPath *)indexPath parameters:(id)parameters;

@end
2.为实现通用性,给SettingCellProtocol扩充两个可选协议方法,搭配SettingCellEventProtocol协议使用
@protocol SettingCellProtocol <NSObject>

- (void)setDataSource:(id)dataSource;

@optional
- (void)setEventDelegate:(id<SettingCellEventProtocol>)eventDelegate;
- (void)setIndexPath:(NSIndexPath *)indexPath;

@end
3.以SwitchCell为例进行实现cell内部事件处理逻辑,实现协议:
@interface SwitchSettingCell () <SettingCellProtocol>

//...其他属性
//遵循协议
@property (nonatomic, weak) id<SettingCellEventProtocol> eventDelegate;
@property (nonatomic, strong) NSIndexPath *indexPath;

@end


@implementation SwitchSettingCell

- (instancetype)initWithStyle:(UITableViewCellStyle)style reuseIdentifier:(NSString *)reuseIdentifier {
	//...初始化代码
    return self;
}

- (void)setDataSource:(id)dataSource {
    NSParameterAssert([dataSource isKindOfClass:SwitchSettingModel.class]);
    SwitchSettingModel *model = dataSource;
    self.switchView.on = model.isOpen;

    //...
}

//switch切换事件回调
- (void)switchChange:(UISwitch *)sender {
    if ([self.eventDelegate respondsToSelector:@selector(cell:didSelected:parameters:)]) {
        [self.eventDelegate cell:self didSelected:self.indexPath parameters:@(sender.on)];
    }
}

@end
4.修改SettingViewController创建cell部分代码,以接受cell内部事件
- (UITableViewCell *)tableView:(UITableView *)tableView cellForRowAtIndexPath:(NSIndexPath *)indexPath {

	//...其他代码

    if ([cell respondsToSelector:@selector(setEventDelegate:)] &&
        [cell respondsToSelector:@selector(setIndexPath:)]) {
        [cell setIndexPath:indexPath];
        [cell setEventDelegate:self];
    }

    return cell;
}
5.SettingViewController实现cell事件协议处理相关逻辑
1
2
3
4
5
6
7
8
#pragma mark - SettingCellEventProtocol

- (void)cell:(UITableViewCell *)cell didSelected:(NSIndexPath *)indexPath parameters:(id)parameters {
    if (self.models.count > indexPath.section &&
        self.models[indexPath.section].count > indexPath.row) {
        NSLog(@"%@:\nmodel: %@\nchange switch: %d", cell, self.models[indexPath.section][indexPath.row], [parameters boolValue]);
    }
}
在该回调中,可以通过判断cell类型/索引/参数等方式进行区分cell来处理相应业务逻辑。
0x5 MVP
在同一家公司下,有多个不同的app中需要类似的设置页面,如货拉拉的司机端、用户端、企业端等。或者其他app的设置页,如淘宝等。可以通过使用MVP设计模式切换presenter来实现不同业务线的设置页面。
通过构建不同的业务presenter为ViewController提供dataSource和实现cell、cell内部的点击事件。可以达到共用同一套流程代码,通过配置presenter的数据源和修改事件处理来处理不同业务。
1.声明presenter协议
将ViewController中的数据源构造与事件处理、整个设置页的通用配置抽到presenter进行实现。
- dataSource: 所有cell的数据源
- separatorInset: cell分割线的缩进
- title: 设置页面的标题
@protocol SettingPresenterProtocol <SettingCellEventProtocol>

- (NSArray<NSArray<id<SettingModelProtocol>> *> *)dataSource;
- (UIEdgeInsets)separatorInset;
- (NSString *)title;

@end
2.构建淘宝的presenter
1
2
3
4
5
6
7
8
9
10
11
12
13
14
15
16
17
18
19
20
21
22
23
24
25
26
27
28
29
30
31
32
33
34
35
36
37
38
39
40
41
42
43
44
45

@interface TaobaoSettingPresenter : NSObject <SettingPresenterProtocol>

@end

@implementation TaobaoSettingPresenter

- (NSArray<NSArray<id<SettingModelProtocol>> *> *)dataSource {
   return [self getDataSourceFromCode];
}

- (UIEdgeInsets)separatorInset {
    return UIEdgeInsetsMake(0, 12, 0, 0);
}


- (NSString *)title {
    return @"淘宝-设置";
}

#pragma mark - Cell Click

- (void)avatar {
    NSLog(@"avatar");
}

- (void)address {
    NSLog(@"address");
}

- (void)myProfile {
    NSLog(@"myProfile");
}

//...


#pragma mark - SettingCellEventProtocol

- (void)cell:(UITableViewCell *)cell didSelected:(NSIndexPath *)indexPath parameters:(id)parameters {

}

@end
4.修改SettingViewController代码,将数据源获取与事件处理指向presenter
@interface SettingViewController : UITableViewController

@property (nonatomic, strong) id<SettingPresenterProtocol> presenter;

@end

@implementation SettingViewController

- (void)viewDidLoad {
    [super viewDidLoad];
    //...
    self.dataSource = self.presenter.dataSource;
}


- (UITableViewCell *)tableView:(UITableView *)tableView cellForRowAtIndexPath:(NSIndexPath *)indexPath {
    //...
    [cell setEventDelegate:self.presenter];
    return cell;
}

- (void)tableView:(UITableView *)tableView didSelectRowAtIndexPath:(NSIndexPath *)indexPath {
    if (self.dataSource.count > indexPath.section &&
        self.dataSource[indexPath.section].count > indexPath.row) {
        id<SettingModelProtocol> model = self.dataSource[indexPath.section][indexPath.row];
        if ([self.presenter respondsToSelector:model.responseSelector]) {
            [self.presenter performSelector:model.responseSelector withObject:model.model];
        }
    }

}

@end
3.构建货拉拉的presenter:用户端、司机端(流程一致,不赘述)
0x6 数据源JSON化
在上述流程中,可以将构建数据源这块硬编码部分改为使用加载json文件的形式进行提供数据给presenter,这样可以通过后端下发配置的形式更灵活的动态修改设置页面的样式和排序。
由于SettingModel中的model是id类型,与cellClass对应的cell类型对应,是在硬编码部分直接指定的model对象,其类型是从代码中确定的。
而从json中转为model时,也需要将其转为对应的model类型,而非dictionary类型。即硬编码指定model对象类型这步逻辑,需要下沉到json数据文件中,json文件中model.modelClass就是用来指定model对象的类型
1.编写json文件
1
2
3
4
5
6
7
8
9
10
11
12
13
14
15
16
17
18
19
20
21
22
23
24
25
26
27
28
29
30
31
32
33
34
35
36
37
38
39
40
41
42
43
44
45
46
47
48
49
50
51
52
53
54
55
56
57
58
{
    "data": [
        [
            {
                "cellClass": "AvatarSettingCell",
                "responseSelector": "avatar",
                "model": {
                    "modelClass": "AvatarSettingModel",
                    "title": "青藏澳元",
                    "subtitle": "账号名:酱鸭做吗",
                    "avatar": "https://img.touxiangkong.com/uploads/allimg/2022021820/awmxjquxevq.jpg"
                }
            },
            {
                "cellClass": "SampleSettingCell",
                "responseSelector": "address",
                "model": {
                    "modelClass": "SampleSettingModel",
                    "title": "我的收获地址",
                    "hideAccessory": false,
                    "accessoryTitle": ""
                }
            },
            {
                "cellClass": "SampleSettingCell",
                "responseSelector": "myProfile",
                "model": {
                    "modelClass": "SampleSettingModel",
                    "title": "我的档案",
                    "hideAccessory": false,
                    "accessoryTitle": "添加档案,获得精准推荐"
                }
            }
        ],
        [
            {
                "cellClass": "SampleSettingCell",
                "responseSelector": "account",
                "model": {
                    "modelClass": "SampleSettingModel",
                    "title": "账号与安全",
                    "hideAccessory": false,
                    "accessoryTitle": ""
                }
            },
            {
                "cellClass": "SampleSettingCell",
                "responseSelector": "pay",
                "model": {
                    "modelClass": "SampleSettingModel",
                    "title": "支付",
                    "hideAccessory": false,
                    "accessoryTitle": "支付宝账号、免密支付等"
                }
            }
        ]
    ]
}
将编写完成的json文件放入项目中。
2.构造新SettingJsonModel
⚠️也可以直接修改SettingModel中model类型id改为SettingJsonWrapperModel,无需构造SettingJsonModel
这里使用SettingJsonWrapperModel覆写YYModel协议的+ (Class)modelCustomClassForDictionary:(NSDictionary *)dictionary函数来实现自动转为对应model类型的功能.该函数可以将dictionary映射成指定的类,即可以通过匹配逻辑将model转成cell对应的模型类。
当将SettingJsonModel调用YYModel转模型时,由于model的类型是SettingJsonWrapperModel类型,所以会走SettingJsonWrapperModel的modelCustomClassForDictionary:函数,在该函数中判断modelClass字符串,并返回modelClass对应的模型类,即可将SettingJsonWrapperModel转成modelClass指向的类型。
@interface SettingJsonWrapperModel : NSObject <YYModel>

@property (nonatomic, strong) Class modelClass;

@end

@interface SettingJsonModel : NSObject <SettingModelProtocol>

@property (nonatomic, strong) Class cellClass;
@property (nonatomic, assign, nullable) SEL responseSelector;
@property (nonatomic, strong) SettingJsonWrapperModel *model;

@end

@implementation SettingJsonWrapperModel

+ (Class)modelCustomClassForDictionary:(NSDictionary *)dictionary {

    if (dictionary[@"modelClass"]) {
        return NSClassFromString(dictionary[@"modelClass"]);
    }
    return nil;
}

@end
3.修改presenter代码以便使用json方式
@implementation TaobaoSettingPresenter

- (NSArray<NSArray<id<SettingModelProtocol>> *> *)dataSource {
    return [self getDataSourceFromJson];
}

- (NSArray<NSArray<id<SettingModelProtocol>> *> *)getDataSourceFromJson {
    NSString *jsonPath = [[NSBundle mainBundle] pathForResource:@"taobao_settings" ofType:@"json"];
    NSData *jsonData = [NSData dataWithContentsOfFile:jsonPath];
    id jsonObject = [NSJSONSerialization JSONObjectWithData:jsonData options:NSJSONReadingMutableContainers error:nil];
    NSArray<NSArray *> *items = jsonObject[@"data"];
    NSMutableArray *settingModels = [NSMutableArray array];
    [items enumerateObjectsUsingBlock:^(NSArray * _Nonnull obj, NSUInteger idx, BOOL * _Nonnull stop) {
        NSArray *models = [NSArray yy_modelArrayWithClass:SettingJsonModel.class json:obj];
        [settingModels addObject:models];
    }];
    return settingModels.copy;
}

@end
0x7 总结
本篇文章对设置页面这个场景进行了分析与代码结构设计,通过该设计,当该页面发生cell种类变更时,可以通过新增cell种类进行扩展,而不会影响原有逻辑。改变设置页整体风格时,可以新增presenter进行切换,实现共用一套cell与SettingViewController代码的能力,提高了代码的复用性与扩展性。
对于类似的页面,也可以套用这个流程:
- 分析页面,确定易变部分与固定部分
- 确定数据结构
- 编写整体结构代码实现功能
- 优化
- 再优化